Showing posts with label mothers day. Show all posts

Thursday, 20 March 2014

Mothers Day Gift Tutorials - Lavender Heart

Here is another quick and easy gift to make for Mothers Day. A lovely lavender heart with a little message on the back. 

Please note that we have recently updated this tutorial to make an even easier version with a fab You Tube video to show you how. The new instructions are at the end of this original tutorial along with the new video.

You can download the heart pattern for free on the Sew Scrumptious website.  


You will need:

2 small pieces of fabric.
We used a selection from the Sew Scrumptious website.
A small piece of ribbon
A button
Stuffing
Dried lavender (optional)

To personalise with a message

Plain cream tape or ribbon
T shirt transfer paper (available in Asda and WHS stores).

To make the message label

Type out what you want your label to say in a pretty font e.g. Happy Mother's Day. Flip the text before you print it so it is back to front (mirror image) and then print out onto the transfer paper. I do several versions and sizes to make sure I have spares.


Cut out the message to the size of the tape and place face down on your plain tape. You should be able to see the words through the backing paper so make sure they are facing the right way.  Iron on using the instructions in your pack. You usually just hold the iron over the tape for several minutes. 


Wait until cool and then pull the backing paper off to reveal the text on the tape.

To make the heart:

Draw or print out a heart template. Any size is fine. Cut out 2 heart shapes from your fabrics.


If you are making a message label sew this on before you start.


Place the 2 heart shapes together with the right sides facing outwards on both sides and sew all around the edge using your sewing foot as a guide. This will be approx. 1/4 inch seam allowance. Leave a gap on one side large enough to add some stuffing. Make sure you sew backwards and forwards at the start and finish of your sewing to secure the stitches.


I usually add a mix of both stuffing and lavender and sandwich the lavender in the middle. Push the stuffing in to the heart through the gap making sure it goes to the top and bottom of the heart shape.


Then add some dried lavender to the middle to make it small nice! You will need to add a bit more stuffing after to make sure the heart is fully padded and a nice shape. If you don't have any lavender it doesn't matter. It still looks pretty as a hanging heart.


Sew up the gap. You can do this by hand or if you push the stuffing to one side you should be able to do this on your machine although it can be a bit fiddly. Finish off your thread ends neatly. Using a pair of pinking shears trim all around the edge to give it a nice finish and to prevent fraying.


Choose a matching ribbon and make a small hanging loop by crossing over the ribbon. Choose a button and sew on to the ribbon to secure in the cross shape. You can then attach the ribbon loop to the hanging heart at the same time as sewing on the button securely.


The finished Lavender Heart!


If you don't want to make a message tag, you could always add a little pocket for a handwritten note maybe?


New Version:

The new version is very similar and you will need the same items but keep your fabric pieces slighly bigger than your heart template as we will cut into a heart shape at a later stage than before.


Trace around the heart template directly onto the right side of one of the fabric pieces.


Pin to the other piece of fabric wrong sides together.


Put onto your sewing machine and sew together with the edge of your sewing machine against the drawn line. Make sure to sew a few stitches at the start and finish to secure and leave a 3 or 4cm gap open to stuff the heart.


Push some wadding into the heart until the heart is nicely padded. Add some lavender if you wish.


Push the wadding to one side and pin so that you can sew up the gap in the seam. Make sure you use a few back stitches to the start and finish to secure.


Take some pinking shears and trim off the excess fabric using your orignal line as a cutting guide.


Fold the ribbon in a loop and catch in place with a stitch before attaching a button then sew in place at the top of your heart.


Hang up and admire.


Don't forget to have a look at our Handbag Size Tissue Holder Tutorial too. Another perfect Mothers Day Gift!


Don't forget to subscribe to the Sew Scrumptious You Tube Channel for lots of new tutorials and videos. 


Saturday, 15 March 2014

Mothers Day Gift Tutorials - Tissue Holder

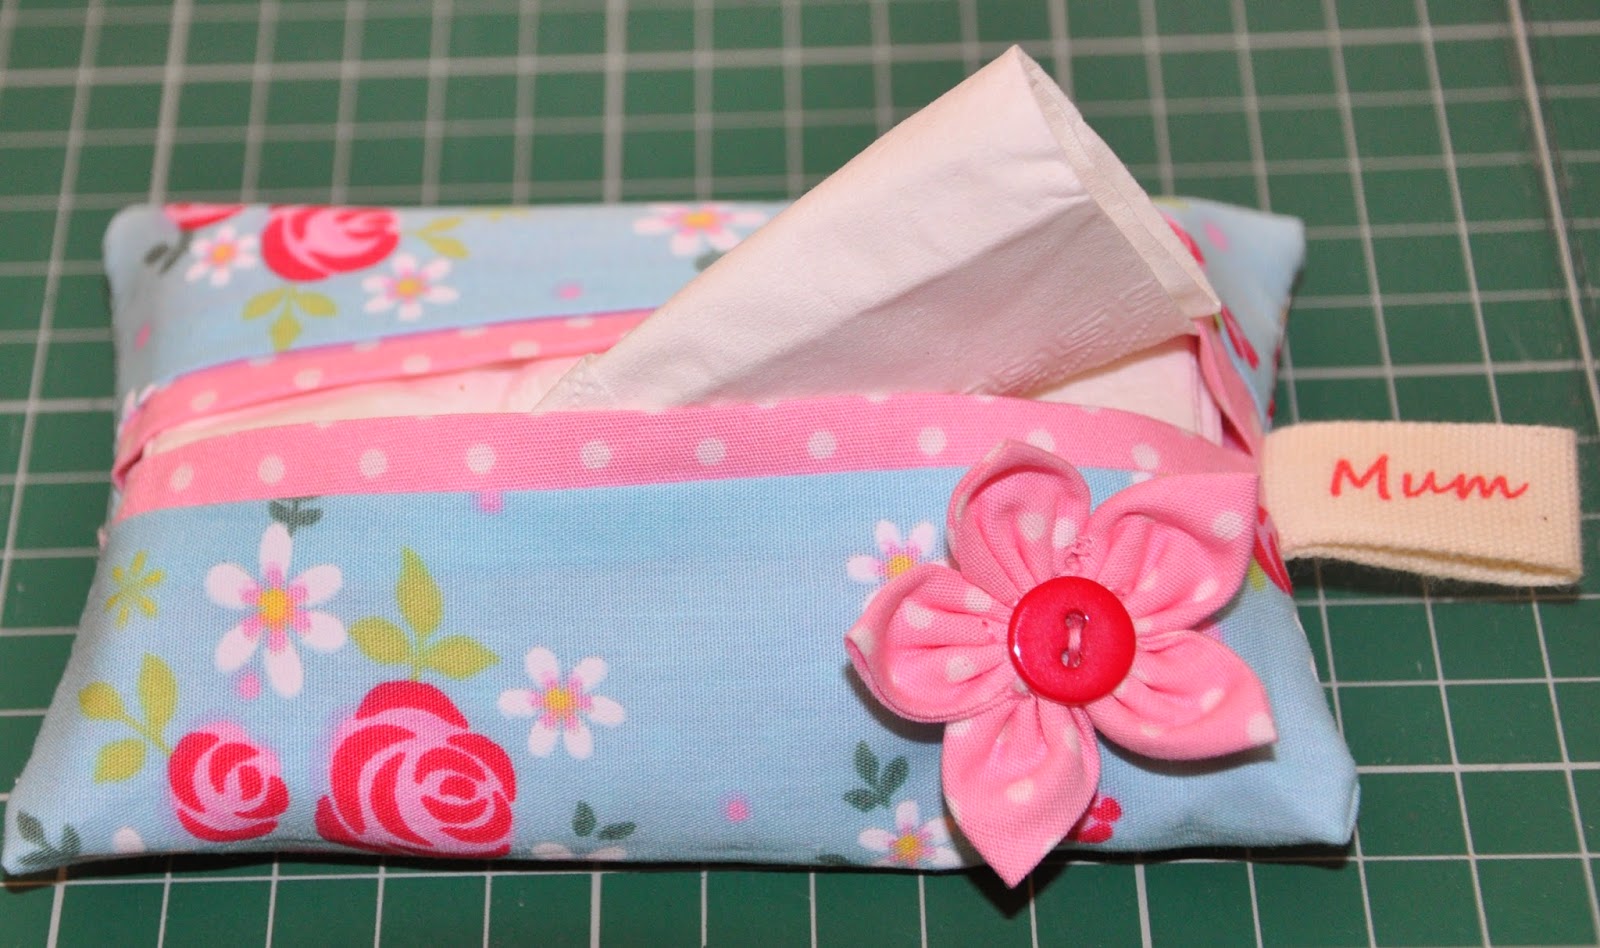
Its nearly Mothers Day so I thought I would share a couple of quick and easy tutorials over the next few days for fabric gifts to make for mums and grandmas. Today is a tutorial for a handbag size tissue holder. This is a project that doesn't take much time and is perfect for novice sewers.


There are lots of tutorials around for these gorgeous handbag size tissue holders but I thought I would share the one that I have found works best for me with a couple of additions to make it extra special! 

You can download the pattern templates for free on the Sew Scrumptious website here

You will need:

2 pieces of co-ordinating fabric (2 fat quarters would make several) 
I used two Sew Scrumptious fabrics - Rose (Blue) Fabric which can be found here and Polka Dot (Pale Pink) fabric which can be found here
1 pack of handbag size tissues
A button

To personalise with a name tag

Plain cream tape or ribbon
T shirt transfer paper (available in Asda and WHS stores).

Lets sew...

Download and print out the pattern templates and cut the outside piece from your main fabric and the lining piece from your co-ordinating fabric.


Place the 2 fabric pieces together pattern sides facing and sew down each short side using a 1/4 inch seam allowance. Don't worry about one side being longer than the other and there being loose fabric on one side. That's how its supposed to look!


Turn inside out so the fabrics are now facing the right way up and press flat so that a little bit of the lining is shown either side of the main fabric.


If you want to add a personalised name label you need to make it now.

Label

Type out what you want your label to say in a pretty font e.g. Mum or Grandma. Flip the text before you print it so it is back to front (mirror image) and then print out onto the transfer paper. I do several versions and sizes to make sure I have spares.


Cut out the name to the size of the tape and place face down on your plain tape. You should be able to see the words through the backing paper so make sure they are facing the right way.  Iron on using the instructions in your pack. You usually just hold the iron over the tape for several minutes.


Wait until cool and then pull the backing paper off to reveal the text on the tape. If you are making a label for the tissue holder, don't forget to leave some plain tape on the right hand side so you can fold it under to make a double sided label to attach


Back to the Tissue Holder!

With the main fabric facing you and the spotty fabric on either side, find the middle point and place the name label as below. Don't forget to take into account your seam allowance. You don't want the name too near the top.


Fold both edges over to meet in the middle and pin. 


Sew up and down the 2 short sides. I usually stitch twice to make sure it is extra strong. Use pinking sheers to trim the edges.


Turn inside out and poke out the corners. You should have a cute little label at one end.


You can also add a pretty little flower using the co-ordinating fabric to make it extra special.

Flower
Find a circle to draw around. The finished flower will come out about the same size as the circle you start with. I would suggest a cotton reel for this particular project.

Cut out 5 circles of your chosen fabric. I chose my lining fabric.


Press each one in half and then in half again so they are quarter circles. Press flat.


Pick up the first quarter circle shape and start sewing a small running stitch close to the edge from one end of the curve to the other. Make sure you get all the layers of fabric though the stitch


When you get to the end pull tightly until the fabric gathers in and a petal shape starts to form. Continue with the next petal using the same length of thread. As you reach the end of each new petal, pull the thread and gather the petal. Ensure the petals are all next to each other as tightly as you can get them.


When you have finished petal number 5 sew a little knot at the end to keep the gathers in places but don’t cut your thread.


Place the two end petals facing together and sew a few stitches near the middle of the flower to attach the two ends together.


Flatten down. You should have a little pretty flower shape!

 
You need to make a back for the flower. I use a little circle of felt.  Sew all around the inside edge of the flower attaching it to the felt using tiny little stitches. If you do this in a co-ordinating thread it will not really show on the front of the flower. It will be covered by a button anyway! 


You can attach your button to your flower at the same time as sewing it on to the tissue holder. This is a bit fiddly. I tend to sew the button to the flower a few times first and then sew on to an item. You can use these flowers to decorate lots of different things. 


Tissue holders are very addictive to make and are perfect for little gifts. Great for using up scraps of fabric too. I got a bit carried away as you can see below! I would love to know if you make something from any of the tutorials. Please send me photos if you do. We love to see them. Please feel free to pin the image below and share on Pinterest.


2016 UPDATE

We have just made a You Tube video tutorial for the tissue holder. Please sign up to the Sew Scrumptious You Tube channel for lots of great sewing tutorials and handy hints.