Saturday, 15 March 2014

Mothers Day Gift Tutorials - Tissue Holder

Its nearly Mothers Day so I thought I would share a couple of quick and easy tutorials over the next few days for fabric gifts to make for mums and grandmas. Today is a tutorial for a handbag size tissue holder. This is a project that doesn't take much time and is perfect for novice sewers.


There are lots of tutorials around for these gorgeous handbag size tissue holders but I thought I would share the one that I have found works best for me with a couple of additions to make it extra special! 

You can download the pattern templates for free on the Sew Scrumptious website here

You will need:

2 pieces of co-ordinating fabric (2 fat quarters would make several) 
I used two Sew Scrumptious fabrics - Rose (Blue) Fabric which can be found here and Polka Dot (Pale Pink) fabric which can be found here
1 pack of handbag size tissues
A button

To personalise with a name tag

Plain cream tape or ribbon
T shirt transfer paper (available in Asda and WHS stores).

Lets sew...

Download and print out the pattern templates and cut the outside piece from your main fabric and the lining piece from your co-ordinating fabric.


Place the 2 fabric pieces together pattern sides facing and sew down each short side using a 1/4 inch seam allowance. Don't worry about one side being longer than the other and there being loose fabric on one side. That's how its supposed to look!


Turn inside out so the fabrics are now facing the right way up and press flat so that a little bit of the lining is shown either side of the main fabric.


If you want to add a personalised name label you need to make it now.

Label

Type out what you want your label to say in a pretty font e.g. Mum or Grandma. Flip the text before you print it so it is back to front (mirror image) and then print out onto the transfer paper. I do several versions and sizes to make sure I have spares.


Cut out the name to the size of the tape and place face down on your plain tape. You should be able to see the words through the backing paper so make sure they are facing the right way.  Iron on using the instructions in your pack. You usually just hold the iron over the tape for several minutes.


Wait until cool and then pull the backing paper off to reveal the text on the tape. If you are making a label for the tissue holder, don't forget to leave some plain tape on the right hand side so you can fold it under to make a double sided label to attach


Back to the Tissue Holder!

With the main fabric facing you and the spotty fabric on either side, find the middle point and place the name label as below. Don't forget to take into account your seam allowance. You don't want the name too near the top.


Fold both edges over to meet in the middle and pin. 


Sew up and down the 2 short sides. I usually stitch twice to make sure it is extra strong. Use pinking sheers to trim the edges.


Turn inside out and poke out the corners. You should have a cute little label at one end.


You can also add a pretty little flower using the co-ordinating fabric to make it extra special.

Flower
Find a circle to draw around. The finished flower will come out about the same size as the circle you start with. I would suggest a cotton reel for this particular project.

Cut out 5 circles of your chosen fabric. I chose my lining fabric.


Press each one in half and then in half again so they are quarter circles. Press flat.


Pick up the first quarter circle shape and start sewing a small running stitch close to the edge from one end of the curve to the other. Make sure you get all the layers of fabric though the stitch


When you get to the end pull tightly until the fabric gathers in and a petal shape starts to form. Continue with the next petal using the same length of thread. As you reach the end of each new petal, pull the thread and gather the petal. Ensure the petals are all next to each other as tightly as you can get them.


When you have finished petal number 5 sew a little knot at the end to keep the gathers in places but don’t cut your thread.


Place the two end petals facing together and sew a few stitches near the middle of the flower to attach the two ends together.


Flatten down. You should have a little pretty flower shape!

 
You need to make a back for the flower. I use a little circle of felt.  Sew all around the inside edge of the flower attaching it to the felt using tiny little stitches. If you do this in a co-ordinating thread it will not really show on the front of the flower. It will be covered by a button anyway! 


You can attach your button to your flower at the same time as sewing it on to the tissue holder. This is a bit fiddly. I tend to sew the button to the flower a few times first and then sew on to an item. You can use these flowers to decorate lots of different things. 
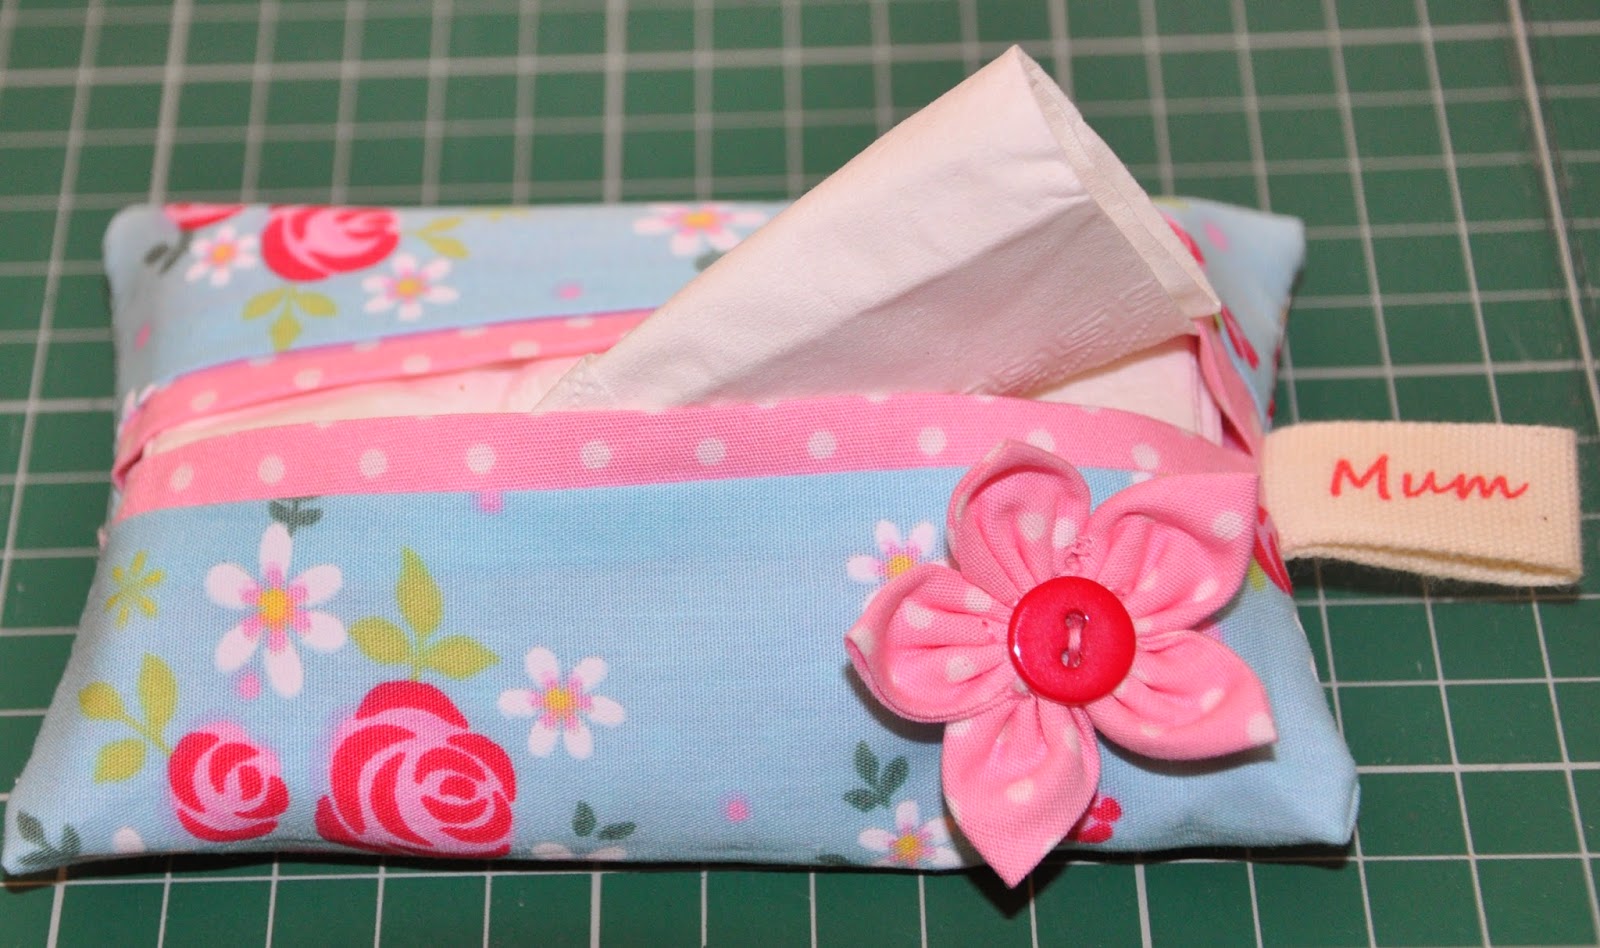


Tissue holders are very addictive to make and are perfect for little gifts. Great for using up scraps of fabric too. I got a bit carried away as you can see below! I would love to know if you make something from any of the tutorials. Please send me photos if you do. We love to see them. Please feel free to pin the image below and share on Pinterest.


2016 UPDATE

We have just made a You Tube video tutorial for the tissue holder. Please sign up to the Sew Scrumptious You Tube channel for lots of great sewing tutorials and handy hints.


Saturday, 1 February 2014

Nintendo DS Case Tutorial

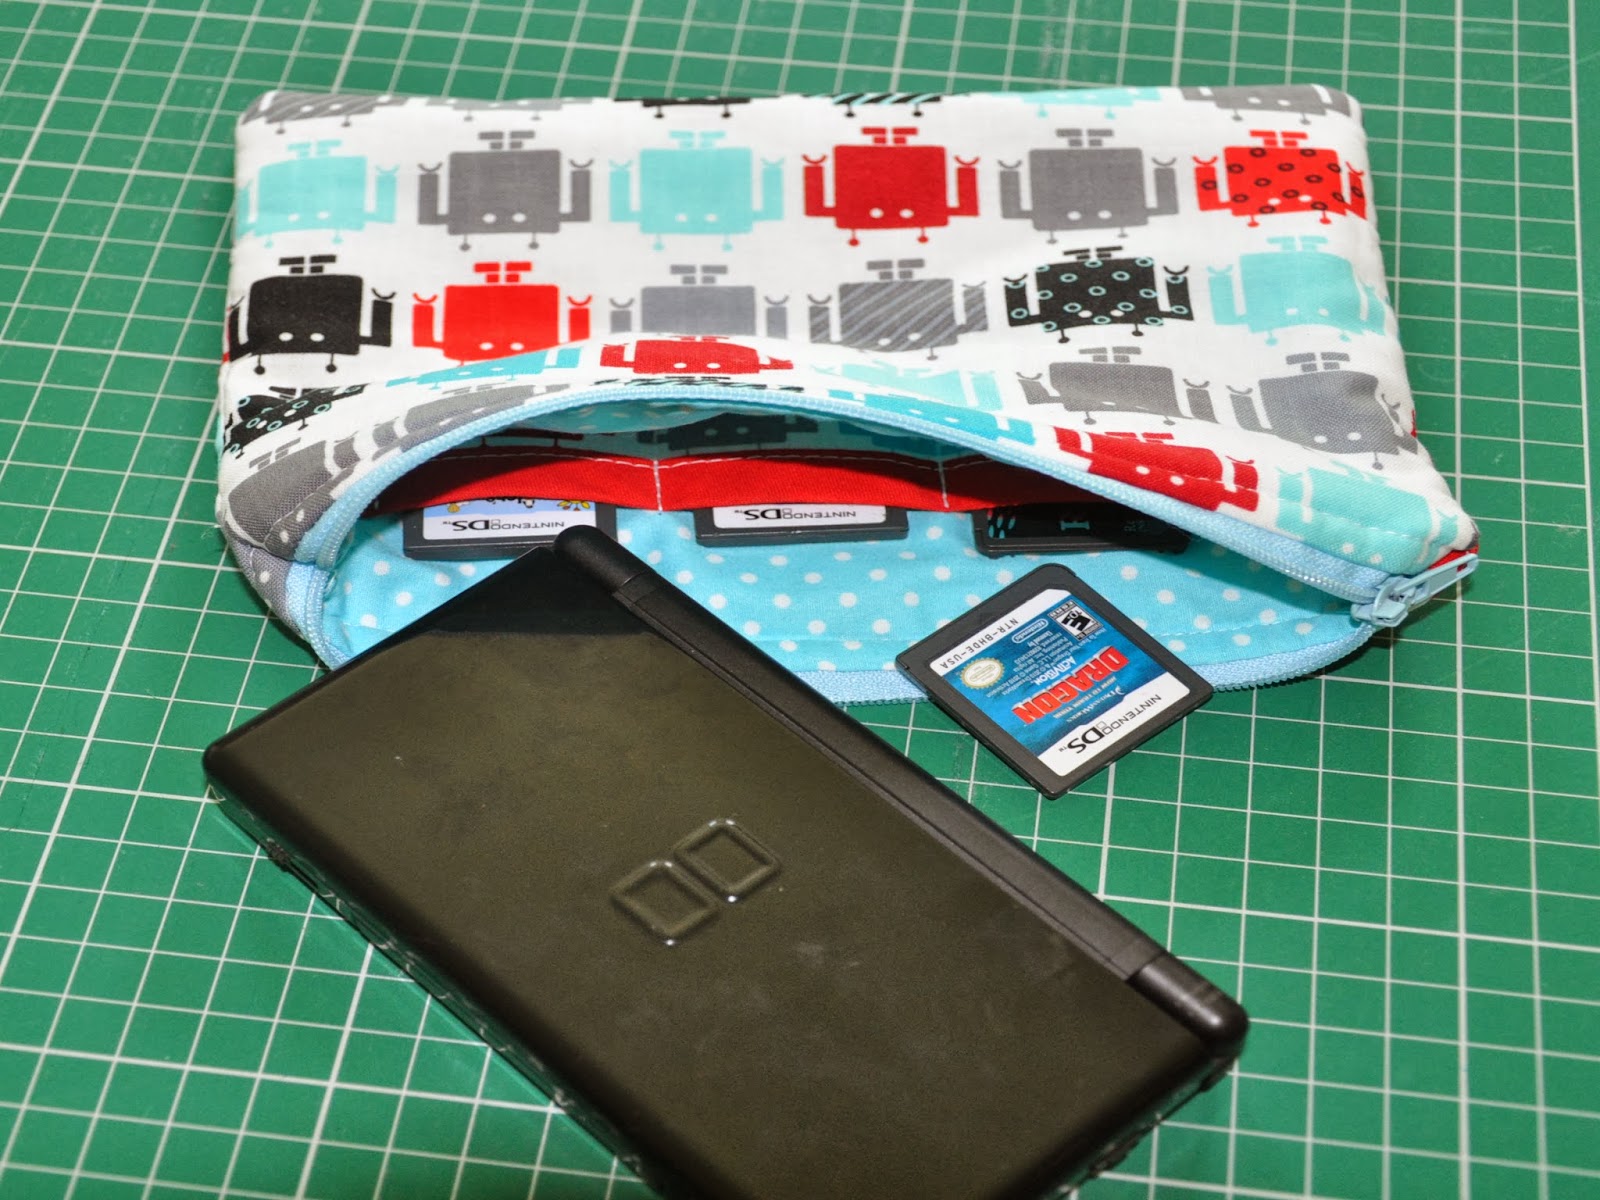
Keep your child’s Nintendo DS console safe and sound with this protective carry case. Slightly padded to protect against knocks and bumps with 3 handy game size pockets inside to ensure that the games never get lost. Perfect for taking on holiday, to restaurants or for long car journeys!   


You will need:

Main Fabric

56cm x 50cm (FQ) Cotton Fabric. I used Funbots (Celebration) by Ann Kelle for Robert Kaufman. This is also used for the pocket. Fabric is available from the Sew Scrumptious website here

Lining Fabric

56cm x 50 cm (FQ) Cotton Fabric. I used Polka Dots (Sky) from the Sew Scrumptious website here

56cm x 50cm Fusible Fleece or wadding. I used Vilene H640 Pellon.

13.5cm of Bias Binding. Any width is fine.

24cm Zip

To Cut:

Main fabric

Cut 2 x 16cm x 22cm pieces for the main case

Cut 1 x 15.5cm x 4.5cm piece for the pocket

Lining Fabric

Cut 2 x 16cm x 22cm pieces for the lining

Fusible Fleece

Cut 2 x 16cm x 22cm pieces

Bias Binding

Cut 1 x 13.5cm long piece

Lets Sew!

1) Iron the fusible fleece to the back of each of the two main fabric pieces using a warm iron. Make sure the fleece is secured in place.

2) Place the pocket fabric piece pattern side down and fold over 1 cm at the sides and bottom and press. Pin the bias binding along the top of the pocket and machine stitch close to the edge.


3) Place the pocket on to one of the lining pieces. The top of the pocket needs to be approx. 4cm from the top of the lining fabric. Make the sure the pocket is in the centre and pin down one side along the bottom and up the other side. Measure 4.5cm along the bottom of the pocket and mark with a pin and then another 4.5cm. This is where you need to sew up and down the pocket to make individual pockets. Starting at the top of the left hand side of the pocket, sew down and along the bottom. At the pin marker, turn and sew up to the top of the pocket, then turn and sew back down again. Continue along the bottom and repeat with the next marker pin. Finish by sewing along the bottom again and up the other side of the pocket.

  
4) Place one of the lining fabrics face up on a table. Place the zip face up on top and then place one of the main pieces of fabric face down so that the tops of each item match up. Pin in place (main fabric, zip & lining fabric together) and sew along close to the zip using a zipper foot. If you flip the top fabric over when you finish, you should see the main fabric on the outside and the lining fabric on the inside. Repeat on the other side of the zip.


5) Fold out flat with the zip in the middle and match up and press each outer layer and lining layer neatly together. Top stitch them together close to the edge of the zip on each side. This ensures that the lining fabric does not catch in the zip. Make sure that the zip is half open for the next stage.


6) Pull the two main fabrics together so that the pattern sides are facing and pull the two lining fabrics together so they are also facing and match up all the edges. Starting at one side of the lining fabric, pin down to the bottom of the main fabric, along the bottom and back up the other side. You need to take account of where the end of your zip is and that is the line you need to sew at the sides. Push the zip towards the lining side when pinning. Sew around the edge.


7) Clip the corners and trim any excess fabric. Pull the bottom of the case through the lining fabric until you get the 2 main fabrics showing. Use your fingers to push out the corners of the main case so they are nice and neat. Fold and press under 1cm all the way around the top of the lining fabric. Match the edges together and sew along to seal the bottom of the lining. Push the lining back inside the case and poke the corners into the corners of the main case so that the lining sits neatly. Press the case one more. Find your Ninendo and put in the case!


Helpful Tips

  • This case should fit most sizes of DS. You may need to make it slightly bigger to fit the new XL version.
  • Add some ribbon and a small swivel clip to one side to attach the case to bags or jeans.
  • Try making your own bias binding for the pocket

They are easy to make for boys or girls. Here are some other versions I have made.


If you make a Nintendo DS Case from our tutorial, please share some photos! We love to see what people make. Please feel free to PIN our tutorials on to Pinterest.  Don't forget there are some fabulous fabrics perfect for this project over on the Sew Scrumptious website! www.sewscrumptious.co.uk

Thursday, 9 January 2014

Bunk Bed Tidy Tutorial

Bunk beds and high sleepers are great for children but there is always the problem of what to do with drinks, books and toys for the person in the top bunk. We were lucky enough to find bunk beds with a shelf next to the top bunk but I wanted to design something for those that don't have shelves hence the Bunk Bed Tidy! It has three large pockets and is designed to hang over the side of a top bunk or high sleeper bed to keep those essential books, soft toys and drinks bottles handy and close to the person sleeping there.  


You will need:

50 cm x 112cm Plain medium to heavyweight Calico fabric

56cm x 50cm (1FQ) cotton fabric for the pockets. I used Field Day - Butterfly Kaleidoscope (Blue) by Josephine Kimberling for Blend available from my online shop here

3.5 metres Bias Binding (2cm wide)

1 metre Velcro

Cutting:

Calico Fabric

Cut one rectangle of fabric measuring 86cm x 44cm.

Pocket Fabric

Cut 3 rectangle pockets 26cm x 21cm

Velcro

Cut 1 x 84cm strip
Bias binding

Cut 3 x 26cm pieces for the pockets

Cut 1 x 262cm piece for the Tidy


Cut out the Calico fabric for the main base of the bunk bed tidy. Pin bias binding all the way around the edge of the fabric to hide the edges and sew all around close to the edge. Make sure that the corners are neatly folded before sewing. Overlap the bias slightly at the start/finish


Sew one half of your Velcro strip to the back of your Calico fabric. The first strip should be positioned just under the bias binding along the top and the second approx.13cm below the top of the Calico so you have 2 straight lines of Velcro. It might be worth checking that these measurements will fit the rails your particular bunk bed before you start to sew. Sew all the way around each Velcro strip.  
 

Take your pockets and pin bias binding along the top edge only. Sew the bias binding close to the edge on all 3 pockets.

  
Turn the pockets over and fold over 1cm at the sides and bottom of the pockets and press.


Pin the pockets to the front of the Calico fabric spacing them out equally. Allow approx. 3 cm between pockets and 4cm from the bottom. Sew the pockets to the Calico fabric ensuring that you reinforce the top of the pockets by sewing forward and backwards several times at the top of each pocket.
  

The top of the bunk bed tidy should fold over the top rail of the bunk bed and attach to the second row of Velcro holding it securely in place.


You have a Bunk Bed Tidy!


Helpful Tips

  • Use 1cm seam allowance for the pockets
  • You could use 3 different fabrics for the pockets or applique plain pockets with a child’s initials.
  • You can use denim or canvas fabric instead of Calico
  • Why not make your own co-ordinating bias binding
  • The design could easily be adapted to fit a single bed or a different design bunk bed.  
 This is another Tidy made for a friend.

 
If you make a Bunk bed Tidy please share some photos. We love to see what you make! If you love this tutorial, please feel free to PIN the image below on to pinterest.  


Happy Sewing!